 Svenesis.org
29 July 2026 · 🔭 Astronomy
Mono Camera, Filter Wheel and My Filters – Which Light I Collect
My astro camera is monochrome – it sees no colour, only brightness. That sounds like a drawback, but it is a deliberate trade-off. A colour sensor has a tiny colour filter bonded in front of every pixel and has to reconstruct colour from the neighbouring pixels. My mono sensor gets the full light on every pixel – sharper and more sensitive – and I get to decide which slice of that light gets through by turning a filter in front of it.
The price is real: more equipment, a separate run of exposures for every colour, and considerably more time per image. For me the trade is worth it – above all because it is what makes narrowband possible in the first place. Between the optics and the camera sits a filter wheel with eight slots, which my capture software N.I.N.A. (Nighttime Imaging 'N' Astronomy) advances automatically. How the sensor itself works is in the camera article – this one is about the filters in front of it.
The trick is this: I shoot the same target several times, each time through a different filter, and put the frames back together at the computer. Which filters I have, what they let through and what they are good for – that is what this is about.
A short detour into light
Light is a wave, and its wavelength (measured in nanometres, nm) determines its colour. Our eyes see only a narrow strip of it – from roughly 380 nm (violet) to 700 nm (deep red). Below that lies the ultraviolet, above it the infrared; we see neither, but a camera sensor sees part of both.
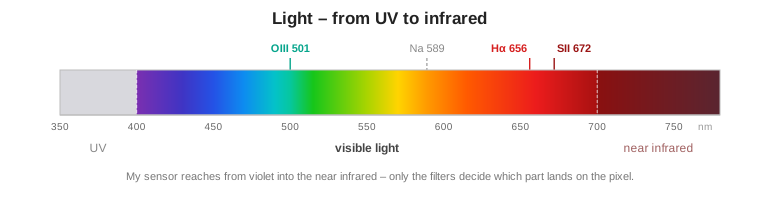
For astrophotography what matters is how an object spreads its light across those wavelengths – and there are two patterns:
- Broadband: stars and galaxies shine across the whole visible range, like a light bulb. You capture that with wide colour filters.
- Narrowband: gas nebulae, by contrast, glow at only a few very specific wavelengths, because individual elements – hydrogen, oxygen, sulphur – emit light at exactly those “lines”. Capture only those lines and the nebula still comes through, even under moonlight and a city sky.
That split is exactly how my filters are grouped.
My filters at a glance
The wheel holds seven filters (the eighth slot stays empty), in two families:
- Broadband – Antlia LRGB V-Pro: luminance (L), red (R), green (G), blue (B).
- Narrowband – Antlia 4.5 nm Edge SHO: hydrogen (Hα), oxygen (OIII), sulphur (SII).
All of them are 1.25″ and equally thick (2 mm of glass), which makes them parfocal – so in theory I would not have to refocus on a filter change at all, only apply a small filter offset. Except that I have never measured those offsets. So every filter change triggers a full autofocus run instead: it costs time, but it lands reliably.
The broadband filters: LRGB
These capture the natural light – for everything that shines across the whole range: galaxies, star clusters, reflection nebulae, stars.
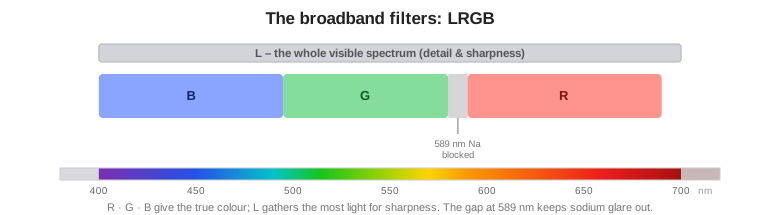
- L (luminance), roughly 380–700 nm: passes practically all visible light, with UV and IR cut off. This is my detail-and-brightness layer – most of the exposure time goes here, because L gathers the most light and carries the sharpness.
- R / G / B (roughly B ≈ 390–500, G ≈ 500–580, R ≈ 590–690 nm): one section of the spectrum each. Combined they give the true colour. The red filter has a hard upper limit at around 690 nm so that no infrared leaks into the red channel – silicon sensors are very sensitive in the IR, which would bloat stars and skew colours. So the RGB set needs no separate UV/IR block filter. On top of that the V-Pro filters deliberately leave a gap around 589 nm (sodium street lighting), which suppresses light pollution.
Antlia only publishes transmission curves for the broadband filters, not exact cut-offs – the figures here are read off those curves.
L + R + G + B make an LRGB image: L supplies the sharpness, RGB the colour.
The narrowband filters: SHO
These three capture only the emission lines of gas nebulae, each just 4.5 nm wide. Because they block almost everything else, moonlight and city glow included, they still work in conditions where broadband data would simply be swamped.
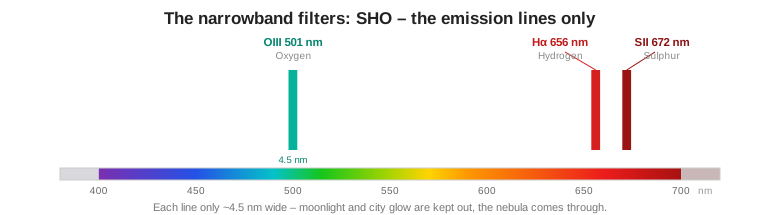
- Hα (hydrogen), 656.3 nm · FWHM 4.5 nm: the strongest line in the sky, deep red. The classic for glowing gas nebulae.
- OIII (oxygen), 500.7 nm · FWHM 4.5 nm: blue-green. Especially strong in planetary nebulae and supernova remnants.
- SII (sulphur), 671.6 nm · FWHM 4.5 nm: a red even deeper than Hα, and usually the faintest of the three. Mostly it matters for the colour palette.
Which filter for which target?
| Filter | Captures | Best for | Examples |
|---|---|---|---|
| L | all visible light | the sharpness and detail layer for anything broadband | every galaxy, every star cluster |
| R G B | colour (red / green / blue) | true colour | galaxies, globular and open clusters, reflection nebulae, comets |
| Hα | hydrogen, 656 nm | emission nebulae, spiral-arm regions, supernova remnants | North America, Heart, Rosette, Eagle Nebula (M16) |
| OIII | oxygen, 501 nm | planetary nebulae, supernova remnants, blue-green nebulosity | Veil, Ring (M57), Dumbbell (M27) |
| SII | sulphur, 672 nm | emission nebulae, mostly for the colour palette | the same H II regions as Hα, only fainter |
And the Moon, planets, comets? They shine by reflected sunlight, so their light is broadband – which means L/RGB (for the Moon: L for the sharpness, RGB for the subtle colour). Narrowband buys you nothing here; it would only throw light away, because there are no narrow emission lines to catch. My short-focal-length wide-field rig is not built for planets anyway – they come out tiny.
The strongest combinations
LRGBtrue colour
LRGB
L carries the sharpness, R, G and B the colour. For galaxies, star clusters, reflection nebulae and star-rich fields – and it needs a dark sky.
SHO, the “Hubble palette”false colour
SII → RHα → GOIII → B
The gold-and-teal look of the famous Hubble images. Ideal for emission nebulae – and it works under moonlight and a city sky too.
HOOfalse colour, near-natural
Hα → ROIII → G + B
Two filters, three channels. A “truer” look for targets rich in Hα and OIII when SII is weak.
HαRGBtrue colour + narrowband
L R G BHα → R+
An LRGB image with Hα blended into the red channel. It brings out delicate wisps of nebulosity without losing the natural star colours.
A concrete case: SH2-129 in HOO
What such a mapping actually does is easiest to show with an image of my own. I shot SH2-129 – the “Flying Bat” nebula, with the Squid Nebula OU4 sitting inside it – in HOO, using two filters only:
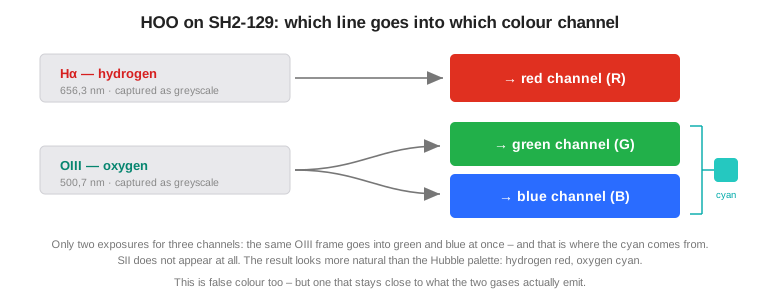
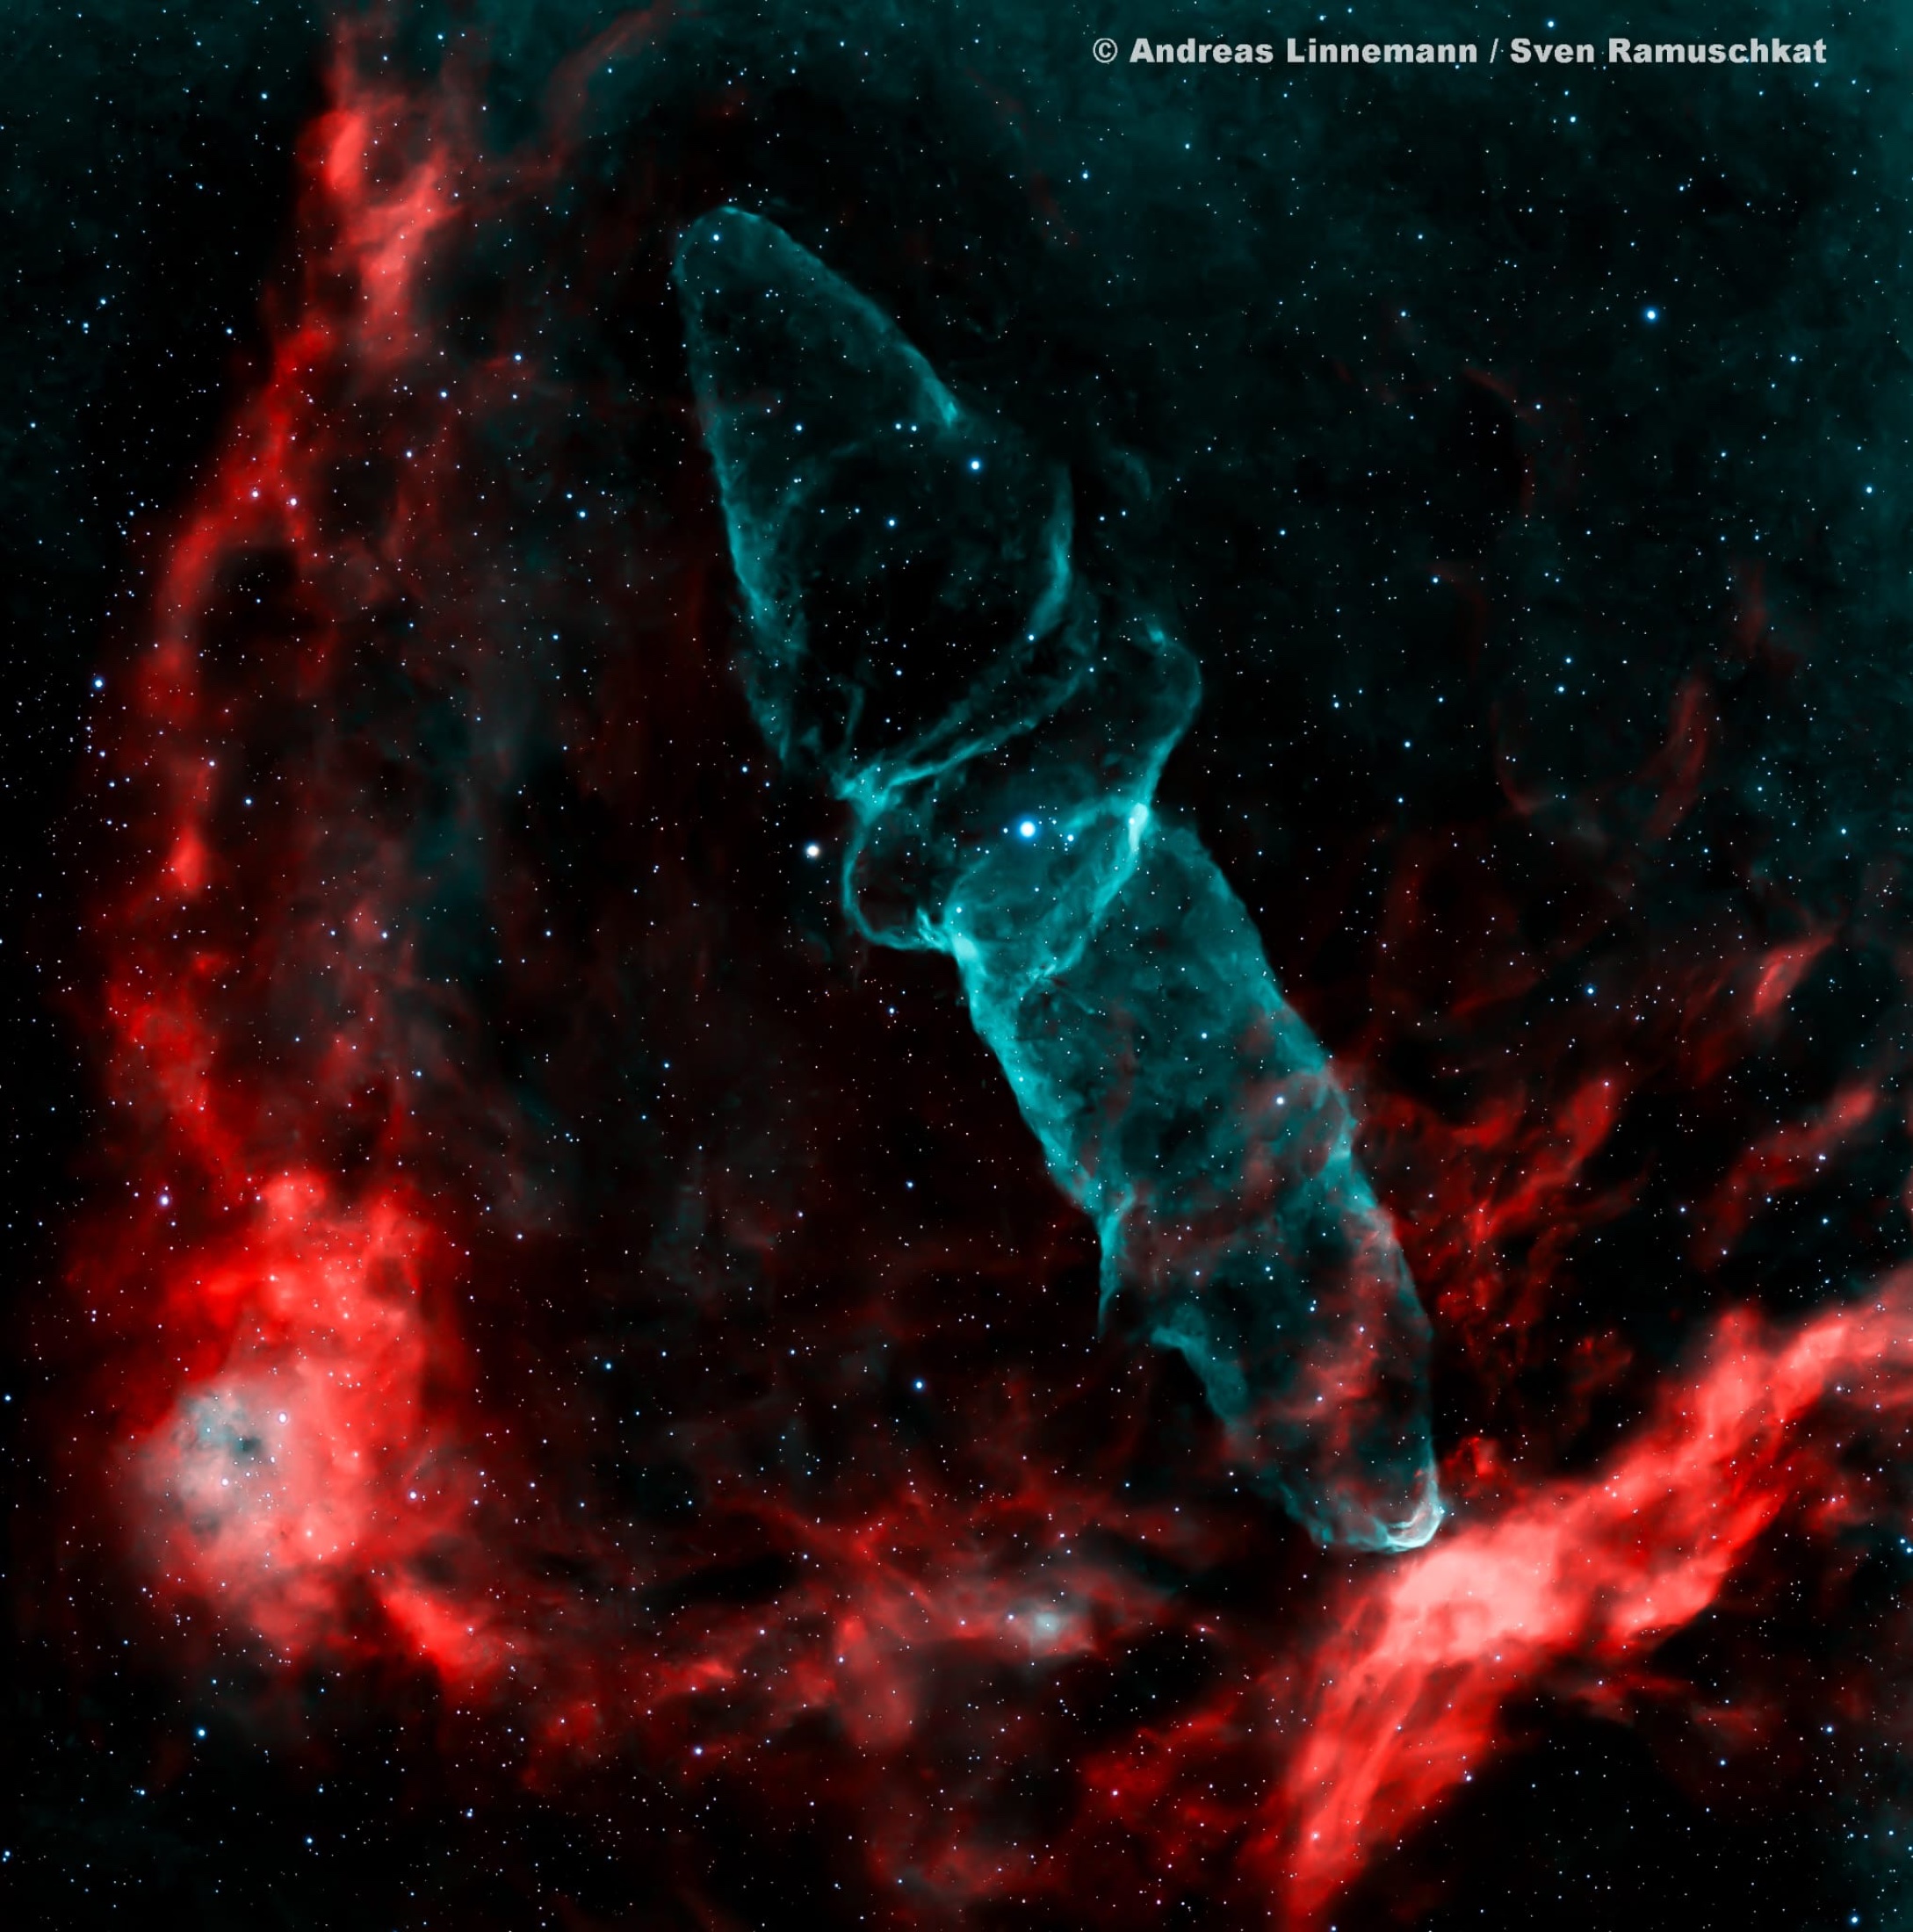
Getting anything cyan to show up at all was the real work here. OU4 is one of the faintest OIII targets in the sky, and the exposure time is split accordingly:
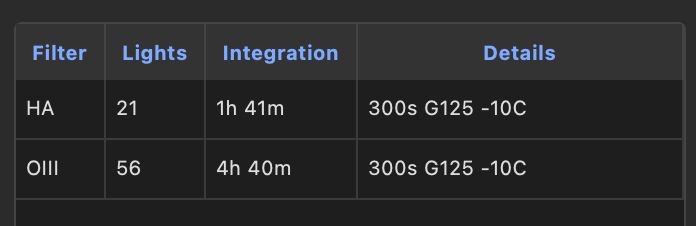
21 frames of 300 s in Hα (1 h 41 min) and 56 of 300 s in OIII (4 h 40 min), all at gain 125 and a sensor temperature of −10 °C – a good six and a half hours all told for a single image, collected across two nights of full Moon. Which is why a narrowband image is rarely finished in a single night – and exactly what those 4.5 nm are for: in LRGB, with that Moon up, there would have been nothing worth keeping.
One gap belongs in the honest account: for this image we used neither darks nor flats – I simply have not shot any yet. Hot pixels are largely taken care of by dithering, and the IMX533 is frugal with dark current anyway. The missing flats weigh more heavily: vignetting and dust shadows then have to be dealt with in processing. Both are on my list.
Rule of thumb: broadband wants a dark sky – galaxies and star clusters. Narrowband shrugs off the Moon and the city – gas nebulae. So I schedule broadband targets for the moonless nights and save the nebulae for the bright ones.
The real cost in all this is time. In LRGB the luminance takes the lion's share; colour needs less. Narrowband eats far more – those narrow 4.5 nm let so little light through that hours pile up per channel.
A word on the maker: Antlia
Antlia is an Asian filter maker specialising in astronomy, a brand that grew up with the CMOS wave. On price the brand sits in the upper middle of the market – clearly below the premium names Chroma and Astrodon (often two to three times as expensive), but well above entry-level glass. Quality across the range is very good: tight, well-controlled bandwidths, high transmission, strong OIII. Not quite as consistent as the premium brands, and around bright stars – especially in OIII – halos can show up.
My narrowband filters are Antlia's 4.5 nm Edge series, the cheaper line below the 3 nm Pro filters – but designed for fast focal ratios (down to about f/3), which suits my system. I did not choose Antlia at all, as it happens: the filters simply came with the second-hand system – and turned out to be a sensible choice.
Why the effort is worth it
A colour photo in one click would be easier. But the awkwardness is precisely the appeal: because I take the light apart by type and put it back together, I decide what the image ends up looking like – natural colour or the gold-and-teal Hubble palette, delicate galaxy arms or glowing hydrogen.
SH2-129 from further up is the perfect example: the Squid Nebula OU4 glows almost entirely in OIII – and so faintly that it simply does not appear in an ordinary RGB image. Only the 4.5 nm oxygen filter separates its light from the rest of the sky and makes it visible at all. And you would never guess from the finished image that the red hydrogen filaments around it come from a completely separate run of exposures. That is the whole point of this filter wheel: I do not just collect light, I choose it.
🔭 The rig behind it: My rig @ Starfront in Texas · What happens behind the filter: From photon to number → · Why every filter change triggers a refocus: Autofocus in N.I.N.A. →