 Svenesis.org
29 July 2026 · 🔭 Astronomy
Autofocus in N.I.N.A. – and What Hocus Focus Does Better
You focus once at dusk and never touch it again? If only.
Over the course of the night the telescope contracts as it cools, the focus point drifts, and on a mono camera every filter change adds an offset of its own. That is why my rig in Texas refocuses automatically – several times a night.
What autofocus actually measures
A star never lands on the sensor as a perfect point; it is always a small blurred disc – and the sharper the focus, the smaller it gets. The HFR (half flux radius) puts a number on that: the radius containing half of the star's light. Sharp means a small HFR, out of focus means a large one. That is all N.I.N.A. needs.
N.I.N.A. moves the focuser through a series of positions and measures the HFR at each one. Because stars grow on either side of best focus, the points trace out a “V” – and the lowest point is best focus.
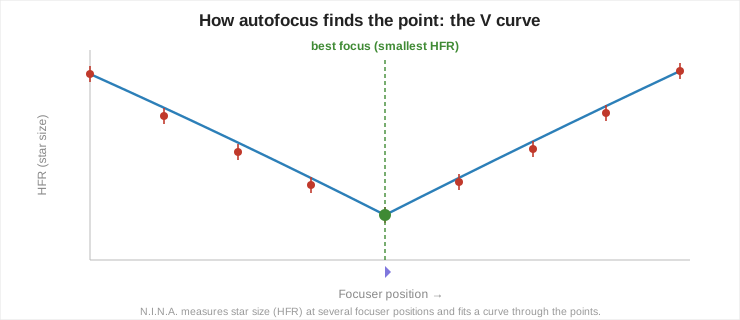
How N.I.N.A. does it, step by step
-
1
Take a reference
The HFR at the current position, the mark to beat. -
2
Move out of focus
The focuser first travels outwards so it can walk the V-curve from both sides. How far is set by initial offset steps (default: 4 steps). -
3
Step back in
One step size at a time, taking an HFR measurement at every position, until there are enough points on both sides of the minimum. -
4
Fit the curve and move there
A curve is fitted through the points, and its minimum is best focus. -
5
Verify
One final frame; if the HFR is at least 15 % worse than the reference, the run counts as a failure and the focuser either returns to its starting position or tries again.
The report – and what the numbers mean
At the end of every run N.I.N.A. shows a result window. The report pictured here comes from the Hocus Focus plugin – more on that shortly – which adds a handful of metrics to the standard report: they tell you not just where focus is, but how much that number can be trusted.
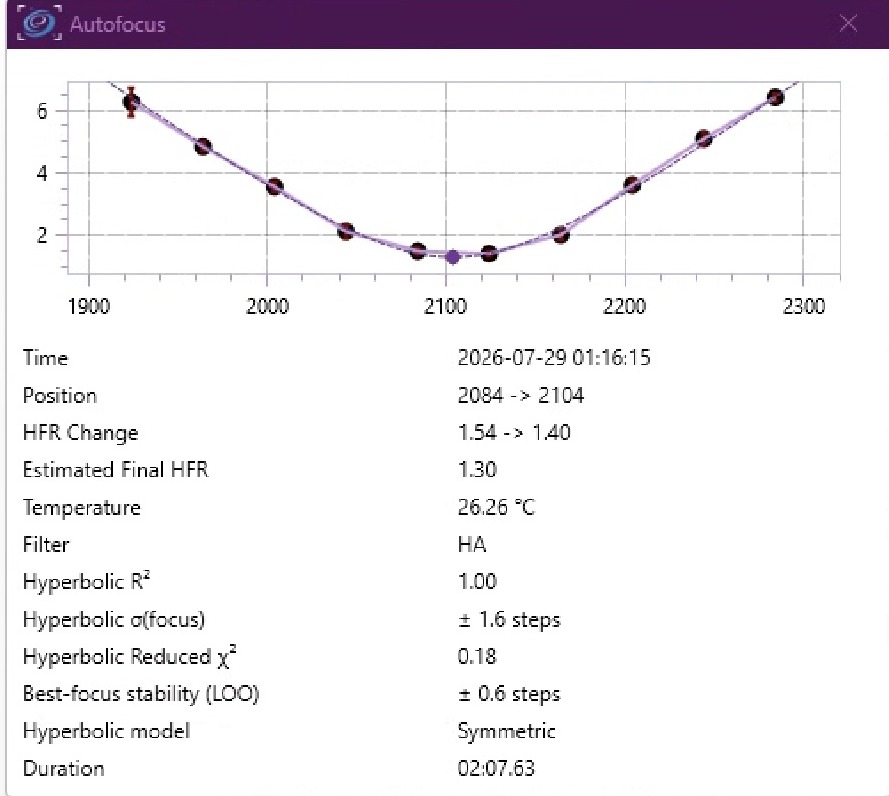
Here is how I read my own run:
| Metric | My run | What it means |
|---|---|---|
| HFR change | 1.54 → 1.40 | star size before the run → after moving to focus (smaller = sharper) |
| Estimated final HFR | 1.30 | the best value predicted from the curve |
| Hyperbolic R² | 1.00 | how well the hyperbola matches the points (1.0 = perfect) |
| σ(focus) | ±1.6 steps | the uncertainty of the focus position it settled on |
| Reduced χ² | 0.18 | fit quality relative to the measurement errors (around 1 or lower means the fit matches the measurement errors) |
| Best-focus stability (LOO) | ±0.6 steps | robustness – see below |
| Hyperbolic model | symmetric | the curve has the same shape on both sides (an asymmetric fit is also possible) |
The most telling number is the LOO stability (leave one out): drop any single measurement and refit, and best focus moves by only ±0.6 steps – so the result does not hang on one lucky point.
Reading the HFR history – the night's ECG
The HFR history panel in the imaging tab shows at a glance whether focus is holding through the night. Each point is one frame, running from left (evening) to right (morning):
- Black line – HFR: sharpness. Flat and low is good. If it creeps upwards, you should be focusing more often.
- Purple line – stars: how many stars were detected – an indicator of conditions. A sudden drop means cloud, dew, or lost guiding.
- Triangles along the bottom: each one marks an autofocus run.
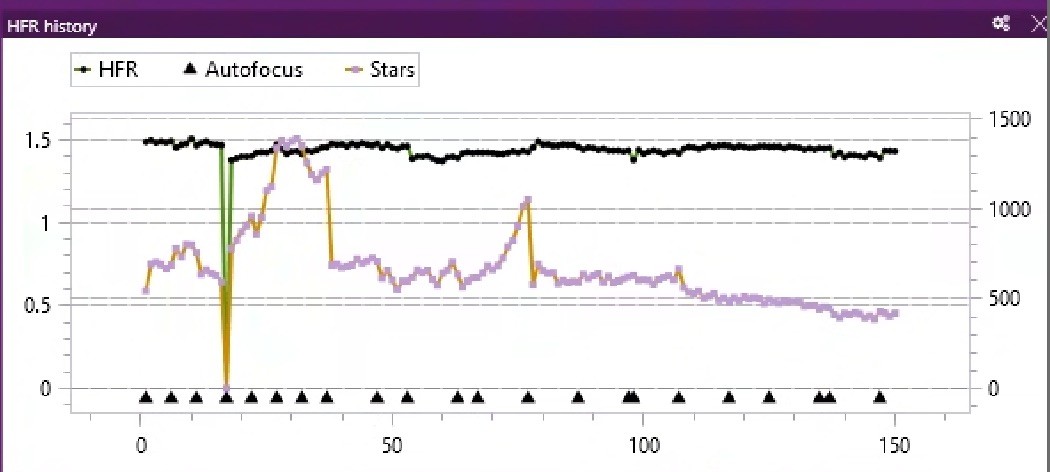
The short vertical spikes at each run are not a fault: while focusing, N.I.N.A. deliberately moves the focus away from its optimum, so the HFR jumps briefly before settling back to its flat normal value.
Hocus Focus – what the plugin improves
Hocus Focus is a free, open-source N.I.N.A. plugin by George Hilios, installable through the plugin manager. It does not throw out the V-curve mechanism – it replaces star detection and the report with better building blocks.
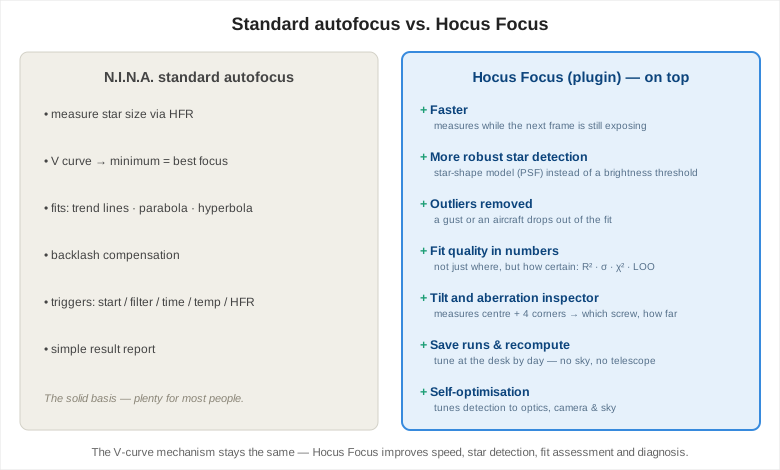
That is exactly what the report above shows: the standard report says “focus at position 2104”. Hocus Focus adds: “…and that is good to a step or two, the fit is spot on.” With a camera 8,500 kilometres away, that confidence is worth a great deal.
You enable it under Options → Imaging → Image Options. It is modular, so you can use individual pieces of it. For the fast engine and the inspector, “Hocus Focus” has to be selected for auto focus and star detection.
What I use – and my conclusion
My setup: Hocus Focus, a hyperbolic curve fit, per-filter exposures (4 s for L/RGB, 15 s for Ha, 20 s for OIII and SII), and autofocus triggered on filter changes and temperature changes.
The standard autofocus is perfectly sufficient for most people – the V-curve, the fits and backlash handling are all built in. Hocus Focus adds more robust detection, outlier rejection, hard numbers, and the tilt inspector on top. The mechanism is still the V-curve; Hocus Focus simply makes it more reliable – and tells me how well it landed.
Those 15 and 20 seconds for the narrowband filters, by the way, did not come out of nowhere. The filter table had the same 4-second autofocus exposure for every filter – right for L/RGB, far too short for narrowband.
It was an inherited default I had never questioned, and with this second-hand rig that turns out to be a pattern: the settings I found in place were often never meant for my optics, my filters, my sky.
Inherited is not the same as verified. I only trust a number once I understand why it is what it is and have held it against a measurable criterion – for focus, that means star count and fit quality, not “looks sharp to me”. I had exactly the same realisation with my guiding RMS and with the humidity sensor on the power box. Tedious, yes – but this way I am not running someone else's rig by the manual; I am coming to understand my own.
Another plugin: Autofocus Report Analysis
Alongside Hocus Focus, Autofocus Report Analysis is worth a look. It does not focus – it calculates. It plots your best-focus positions against temperature, fits a regression line through them and hands you the slope and intercept for the built-in “move focuser by temperature” instruction. With those, focus tracks the temperature continuously through the night instead of needing a full refocus over and over.
For the analysis I fed in every autofocus log sitting in the directory – including the old ones from the previous owner. That gives the analysis a temperature range of 0 to 26 °C to work with.
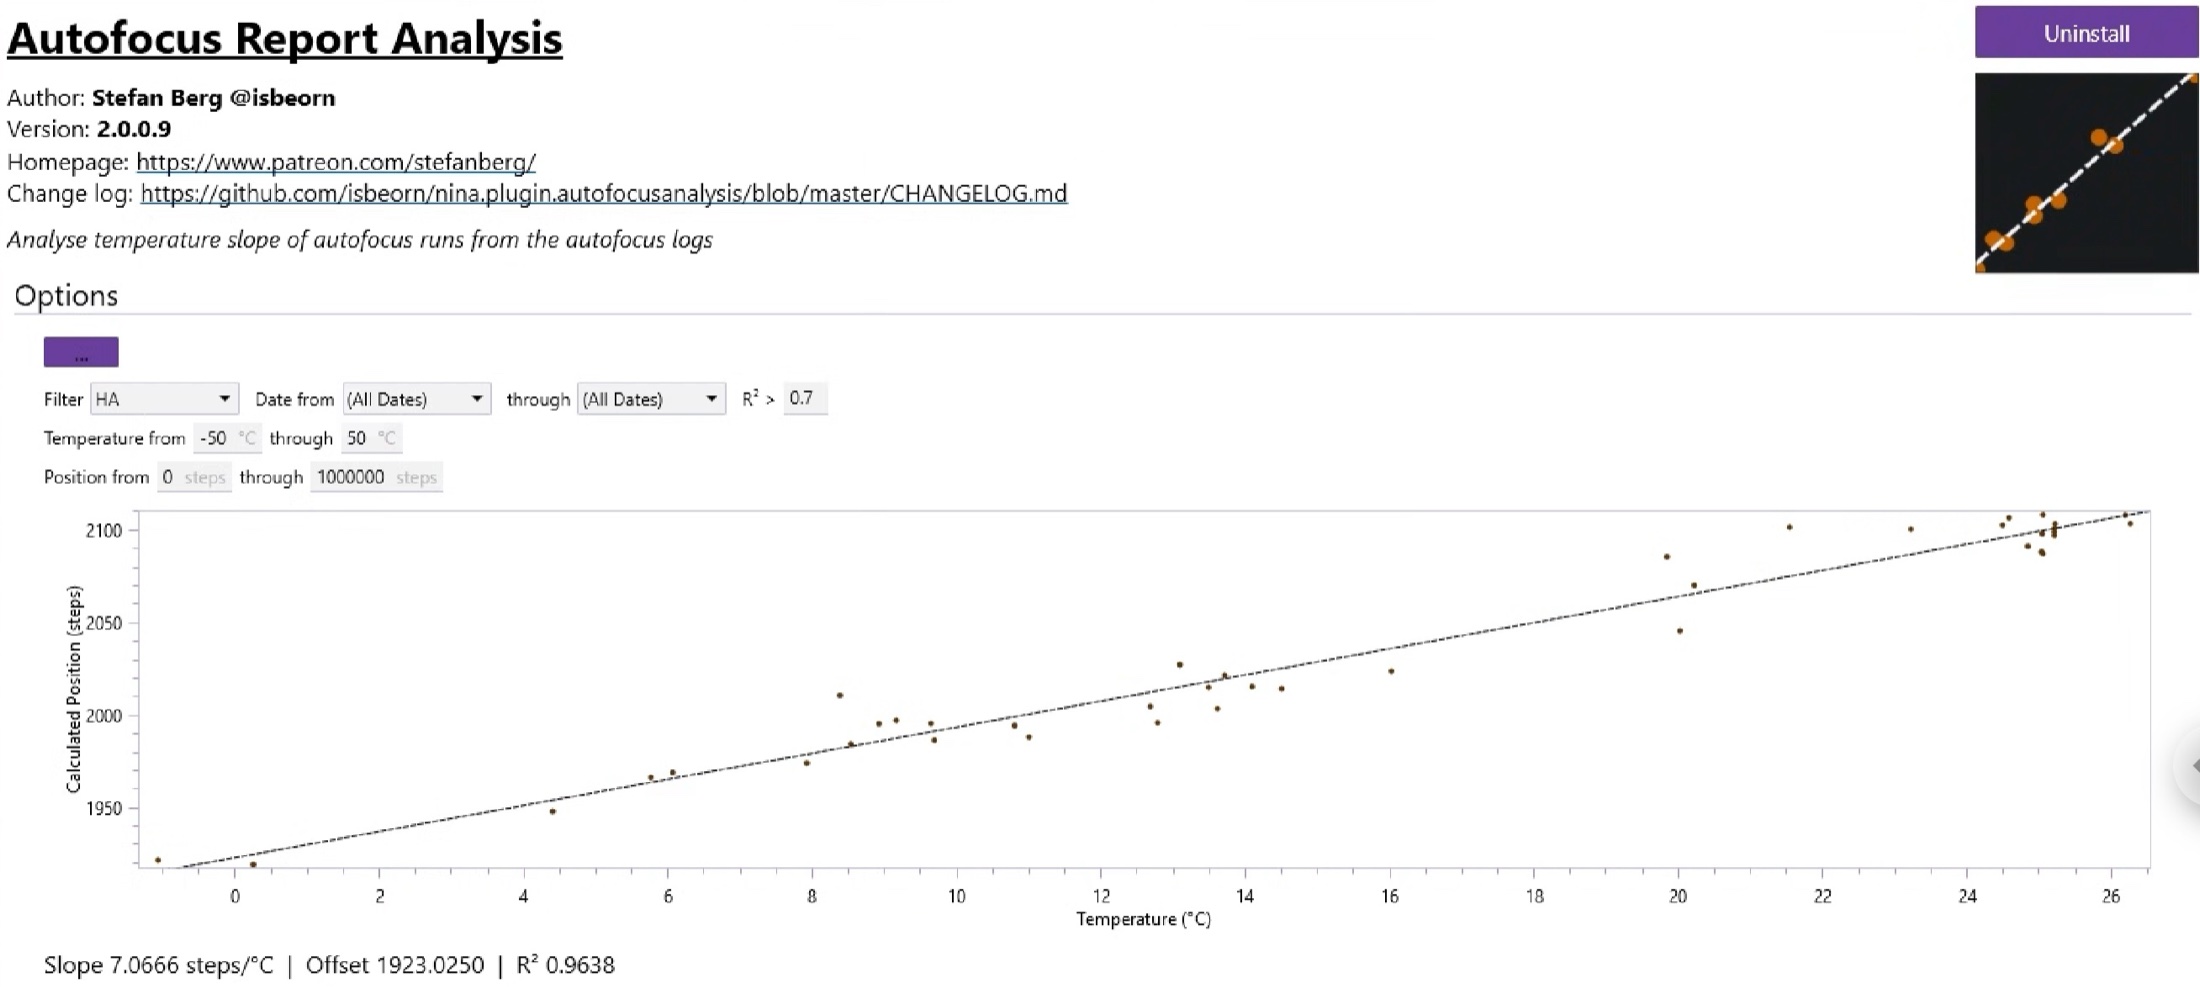
The result is unambiguous: a slope of 7.07 steps per degree, an offset of 1923 and an R² of 0.96 for Ha – and a practically identical 0.98 for OIII. The plugin's filter demands R² > 0.7, and that is comfortably met.
That both filters give the same slope makes sense: thermal focus drift is a matter of the mechanics, not of the filter. The small remaining difference sits in the offset alone – and that is precisely the filter offset.
That a large share of those points comes from the previous owner is not a problem here: it is the same hardware and exactly the same setup – the same GT81, the same EAF, nothing about it changed. So I have no doubt about the 7.07 steps per degree.
The more honest question is a different one: does the slope actually buy me anything? An autofocus run takes me a good two minutes, and with the sheer number of clear nights in Texas, time is not the scarce resource. So the gain would not be more exposure time, but focus that stays right between two runs. And that is already covered by my triggers on filter changes and temperature changes.
On balance the slope is therefore more of a nice by-product than a real lever: it shows that the mechanics behave perfectly linearly across 26 degrees, and on a night that cools down quickly it can save a few runs. At my site it is not a must. A number is only ever as good as its fit – and even a well-fitted number is only worth as much as the problem it solves.
🔭 The rig behind it: My rig @ Starfront in Texas · How the camera measures in the first place: From photon to number → · Another inherited value: Gain and offset →