 Svenesis.org
July 28, 2026 · 🔭 Astronomy
Gain and offset – what the two camera dials really do
Gain and offset are two values set on my Player One Ares-M Pro – a mono camera built around the Sony IMX533 sensor. More precisely: two values that were already there when I got the camera.
I took over my rig as a finished setup, second-hand and already standing in Texas. Gain 125, offset 50 – they came with it. So I didn't choose those values, I inherited them.
At some point I wanted to know whether they were good values or merely the ones that happened to be set – and what the two dials actually do. Here is the version that finally made sense to me.
Gain – amplification, not "more light"
During the exposure the sensor collects photons and converts them into electrons. Gain determines how strongly that signal is amplified before it is turned into digital counts.
Those counts are called ADU, short for analogue-to-digital units. There is nothing mysterious about them: they are simply the numbers that end up in the image file. One ADU is one step of the counter – the smallest difference in brightness the camera can express at all.
Important: more gain does not mean more light is captured – it only turns up the existing signal. It is the volume knob on an amplifier, not the size of the bucket catching the light.
And that is exactly where the catch lies – one that at first glance contradicts the bucket image. The bucket stays the same size. But its contents are poured into a measuring jug with a fixed scale: the analogue-to-digital converter. The louder you turn things up, the more counts each individual electron uses – and the sooner the scale hits its end stop. The pixel could hold more; the number cannot.
In concrete terms: my camera digitises at 14 bit, so the counter knows 16,384 steps – from 0 to 16,383, and no further. At gain 0 a pixel's full 73,000 electrons are spread across those steps. Double the gain and each electron uses twice as many steps – so the counter hits its limit after half as many electrons.
That is why data sheets list a smaller full well at higher gain. What they describe isn't the pixel but the readout chain: at how many electrons is it over, because the counter cannot count any further? For the finished image it amounts to the same thing – bright stars burn out sooner.
So the trade-off is: turn the gain up and read noise falls – but the usable full well shrinks with it. How much that ultimately costs in dynamic range – the span from "just above the noise" to "just short of blown out" – depends on the gain you pick. And there is one important exception.
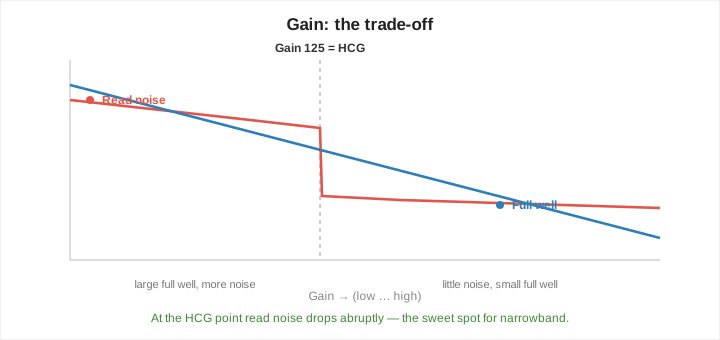
- High gain: low read noise, but a smaller usable full well (the value saturates sooner). Good for faint signal and narrowband.
- Low gain: the full usable well and maximum dynamic range, at the cost of higher read noise. Good for bright targets and delicate star colours.
The jump that decides everything
Modern CMOS sensors have one special point: above a certain gain threshold, read noise drops abruptly. This is called HCG – high conversion gain.
And that jump isn't an accident of the curve, it is a switch inside the sensor itself. Every pixel hands its collected electrons to a tiny capacitor, and that is where the voltage which is later measured actually appears. How much voltage a single electron produces depends on the size of that capacitor: a small capacitor yields more voltage per electron – that is the conversion gain.
Modern sensors have two such modes and switch between them at a fixed gain threshold. Below it the chip uses the large capacitor: it accepts a lot of electrons but produces little voltage per electron – so the noise of the downstream electronics weighs more heavily by comparison. Above it, the chip switches to the small one: each electron now produces considerably more voltage, and the same electronic noise counts for far less in relative terms.
That is why read noise doesn't taper off at this point but jumps – it is a hardware switch, not a dial. And it is why every sensor has exactly one such threshold, listed in its data sheet.
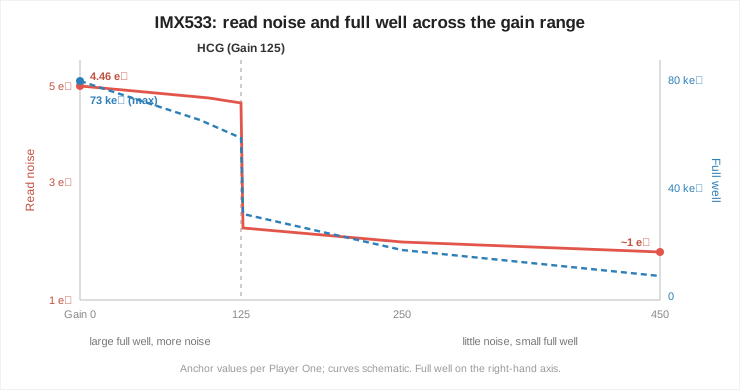
On my Ares-M Pro that threshold sits at gain 125. I didn't invent the number and I didn't measure it either: Player One state it in the camera's data sheet, where it simply says "HCG open at gain=125".
It is not a camera default – Player One specify neither a standard gain nor a standard offset for the Ares.
Which answered my original question: the 125 that came with the rig isn't a value left standing by accident, it is exactly the point at which this sensor switches over. Whoever set the camera up before me knew what they were doing – and I nearly changed it without understanding it.
Here is how the IMX533 behaves in numbers (manufacturer figures from Player One):
| Quantity | at gain 0 | from gain 125 (HCG) |
|---|---|---|
| Read noise | ~4.5 e⁻ | ~1 e⁻ |
| Full well | 73 ke⁻ (maximum) | considerably smaller |
| Dynamic range | largest | almost as high |
| good for | bright targets, star colours | faint narrowband |
And here is the real point: read noise falls from about 4.5 to roughly 1 electron – an enormous win for narrowband. The full well does shrink considerably, but dynamic range stays almost as high as at gain 0, because the steep drop in noise nearly compensates for the smaller full well. Dynamic range is, at heart, full well divided by noise.
That is why the HCG point isn't a compromise you settle for but a sweet spot: much less noise, barely less dynamic range. The only tangible price is the smaller full well – bright stars saturate sooner. Only above HCG does dynamic range really start to fall.
Applying this to other cameras
The principle is the same for every CMOS sensor – only the actual numbers and the position of the HCG point differ. If you know your sensor type (IMX533, IMX571, IMX585, say), you can find the right values in two places:
- On your camera manufacturer's page: read-noise range, full well and usually a gain/noise diagram with the HCG point marked.
- Or measure it yourself with SharpCap 4 and its "Sensor Analysis" function. It shows read noise, e⁻/ADU, full well and dynamic range across the whole gain range. The HCG jump is where read noise suddenly falls – and that is usually the sweet spot. Player One themselves recommend this tool for the Ares.
Once you know your chip's HCG point, you have already found the gain value that matters.
Offset – the pedestal that keeps data from being cut off
The offset is a fixed pedestal value added to every single pixel. It sounds pointless, but it matters.
Every signal has noise, and noise scatters in both directions – downwards too. Without an offset the darkest pixels would mathematically slip below zero. A sensor cannot store negative values; everything below zero is clipped at 0. That loses information at the bottom end and distorts the background.
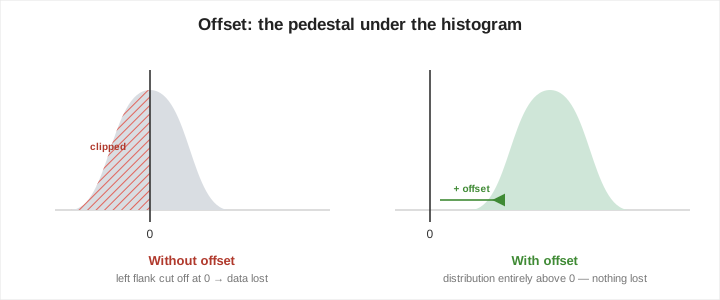
The offset lifts the entire noise distribution safely above zero so that nothing gets clipped. It doesn't change the actual signal – it only moves the zero line up.
My value is offset 50, and this is where my investigation ends without a clear answer: I don't know where the 50 comes from. It came with the rig too. It certainly doesn't come from the manufacturer – Player One specify no offset for the Ares at all, and there is no universally "correct" value anyway. You read it off your own histogram. The practical test: take a bias or dark frame and look at its histogram – as long as there is no pile of pixels stuck against 0 on the left, the offset is high enough. Whether it is then 30 or 50 hardly matters.
I haven't done that test yet – I haven't taken any calibration frames at all so far, as I admitted elsewhere. So for now the 50 stands as an inherited value that looks plausible: high enough to do its job, low enough to cost almost no dynamic range. The proof is still missing.
One rule does matter: the offset must be identical across lights, darks and flats. Otherwise the calibration no longer fits together. The simplest approach is to leave it at the same value everywhere.
My values for the Ares-M – and when I change them
The default I run almost always: gain 125 (HCG), offset 50, with sensor temperature −10 °C as a separate setting. That is my deep-sky setup, particularly for narrowband (Hα, OIII, SII) and faint nebulae: the lowest noise at practically full dynamic range. On the vast majority of nights I don't touch these values.
When I'd move away from that on gain:
- Very bright targets with a wide brightness range – globular clusters, galaxy cores, bright planetary nebulae, colourful star fields in RGB: here gain 0 pays off. The large 73 ke⁻ full well protects star colours and core detail from burning out for longer, and the higher noise barely matters with a bright signal. Player One themselves show their reference dark at gain 0 and offset 10 – but those are the settings of their test frame, not a deep-sky recommendation.
- When subs have to be short – flaky guiding, thin gaps in the cloud, little time: this is where HCG's low noise floor shows its strength, so stay at gain 125.
- In between there is rarely anything worth having – gain 0 and gain 125 cover almost every case.
When I'd change the offset: once I have finally checked it – and then only if the histogram of a bias or dark clings to 0 on the left. All that matters is keeping it identical across lights, darks and flats.
What I do not control with gain and offset: image brightness. That comes solely from exposure time, not from gain.
The mental picture
- Gain = how far you turn up the amplifier. More amplification, less noise, but less headroom.
- Offset = where you place the zero line, so the quiet notes aren't cut off in the silence.
Neither changes how much light the sensor collects – that is exposure time alone. Gain and offset only decide how that light is translated into numbers.
Anyone who knows their camera's HCG point and sets the offset just above the clipping threshold has essentially finished with these two dials – and will hardly need to touch them again.
🔭 The camera in the rig: My Rig @ Starfront in Texas · What happens to the frames afterwards: Seven Filters, One Button → · Why I dither anyway: Dithering →