 Svenesis.org
July 28, 2026 · 🔭 Astronomy
How my CMOS mono astro camera works – from photon to number
I worked out gain and offset in a post of their own. But the longer I spent adjusting my Player One Ares-M Pro – gain, offset, exposure time, temperature – the clearer it became that I hadn't really understood the system as a whole.
What does the sensor actually do with the light, how does that become an image, and how does it all fit together? Here is my attempt to lay it out from end to end – using the Sony IMX533 in mono as the example.
The signal chain: from photon to number
The camera becomes easiest to understand if you see it as a chain in which the signal changes form three times: from light to charge, from charge to voltage, from voltage to a number. And on each of those three conversions sits one of the dials I turn at night.
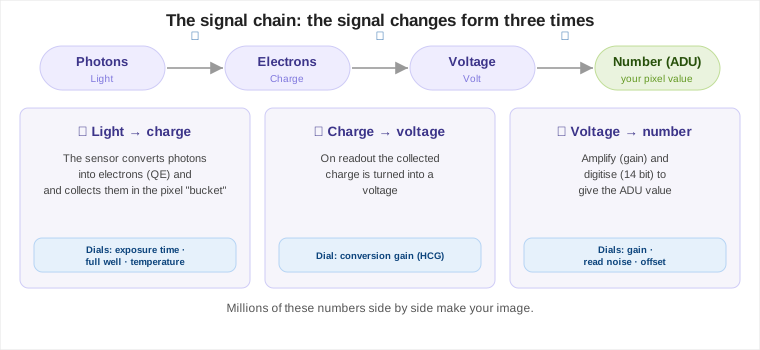
① Light → charge
During the exposure, photons fall on the sensor. Each pixel behaves like a small bucket: it converts some of the photons into electrons – not every photon counts, and that hit rate is the quantum efficiency, up to about 91 % on the IMX533 – and collects those electrons.
How much light comes in at all is determined solely by the exposure time, not by gain. How many electrons the bucket holds before it overflows is the full well – when it overflows, a bright star burns out. And temperature quietly tips a few extra electrons in: dark current. That is why the sensor is cooled.
② Charge → voltage
At the end of the exposure the bucket is read out: the collected charge is turned into a tiny voltage. How much voltage a single electron produces is called conversion gain – and this is exactly where the HCG switch sits, which on the IMX533 drops noise abruptly from gain 125 upwards. The full story is in the gain post.
③ Voltage → number
That voltage is first amplified – this is the actual gain – and then translated by an analogue-to-digital converter into a number: the ADU value. Its bit depth – 14 bits – determines how finely that number is graded.
On readout a fixed amount of noise mixes in, the read noise, and right at the end the offset is added – a pedestal so that nothing is clipped at zero.
Out comes one number per pixel. Millions of them side by side make your image – and that is all the camera does: it counts light and writes the result down as a number.
Noise – why half the theory no longer applies to my camera
In theory there are three noise sources: read noise, dark current and photon noise.
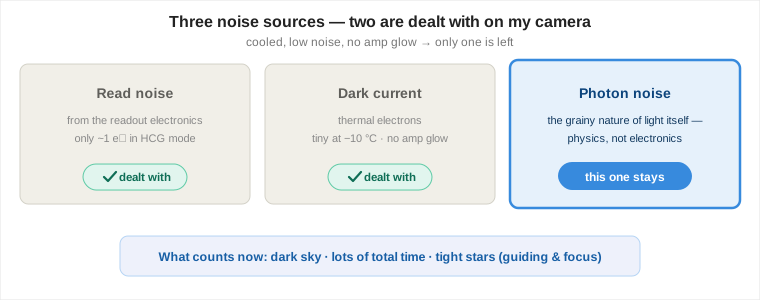
The point is: on a modern, cooled low-noise camera like mine, two of them are effectively dealt with. A large part of the classic theory simply no longer applies.
Read noise sits at only about 1 e⁻ in HCG mode – that is one single electron. (In physics e⁻ denotes the electron, the raised minus standing for its negative charge.) Tiny.
And dark current? It does roughly double for every 6 °C rise in temperature, 5 to 10 °C depending on the sensor, but the IMX533 starts extremely low. Player One quote 0.000044 e⁻/pixel/s at −20 °C and 0.000996 at 0 °C for the Ares-M Pro; at my −10 °C that is roughly 0.0002 e⁻/pixel/s.
A 300-second sub therefore collects barely 0.06 electrons of dark signal per pixel – whose noise, around 0.25 e⁻, sits well below the read noise. That is why −10 °C is enough for me: dark current is already negligible there, and going colder gains almost nothing.
And the IMX533 has no amp glow at all: on many older sensors the readout electronics at the edge of the chip emit a little infrared light of their own, leaving a bright haze in one corner of long exposures. Because it is reproducible you subtract it with darks – here there is simply nothing to subtract.
More important than the absolute temperature is that the cooling is held at a fixed setpoint. Because dark current depends exponentially on temperature, darks have to be taken at exactly the same temperature as the lights – only then do they match. A fixed setpoint makes the same darks reusable for weeks.
What remains is photon noise – the grainy nature of light itself. The camera is therefore photon limited: it isn't the electronics that limit the image, but how many photons arrive.
The goal behind all of it: signal-to-noise ratio
In the end it all comes down to a single quantity: the signal-to-noise ratio, SNR. A good image isn't "bright"; it has a lot of signal relative to the noise.
And because my camera is photon limited, that is no longer decided by the camera dials but above all by three things:
- A dark sky – the sky background is the loudest noise source of all, from light pollution and moonlight. It is the reason my rig stands in Texas and not at home.
- Lots of total time – the strongest lever of all. And stacking beats everything else here: lay many subs on top of each other and the SNR grows with the square root of their number. Four subs double it, a hundred multiply it tenfold. Which is why I collect for hours, not minutes.
- Tight stars – good guiding and sharp focus concentrate the same light onto fewer pixels, meaning more signal per pixel.
The camera dials only do their bit: long subs and HCG gain push read noise below the sky background, cooling keeps dark current small. The big win comes from outside – dark sky and time.
And that inverts the priorities in calibration: because dark current and amp glow barely matter on this camera – and dithering takes care of hot pixels anyway – darks are almost secondary. Good flats against vignetting and dust matter more.
The takeaway
The trick, for me, was to stop looking at the dials individually. It is one chain: photon → electron → voltage → number.
Exposure time determines how much light comes in. Gain, offset and bit depth determine how that light is translated into a number. Cooling, HCG and long subs fight the three noise sources. And stacking, at the end, lifts everything above the rest.
Once you know that chain, no individual value is a mystery any more – each has its fixed place.
🔭 The two dials in detail: Gain and Offset → · Why I dither anyway: Dithering → · What becomes of the subs: Seven Filters, One Button →